INTRAUTERINE DEVICE
- Hormonal IUD. The hormonal IUD releases levonorgestrel, which is a form of the hormone progestin. The hormonal IUD appears to be slightly more effective at preventing pregnancy than the copper IUD. Hormonal IUDs prevent pregnancy for 3 to 5 years, depending on which IUD is used.
- Copper IUD. The most commonly used IUD is the copper IUD. Copper wire is wound around the stem of the T-shaped IUD. The copper IUD can stay in place for up to 10 years and is a highly effective form of contraception.
- Hormonal IUD. This IUD prevents fertilization by damaging or killing sperm and making the mucus in the cervix thick and sticky, so sperm can't get through to the uterus. It also keeps the lining of the uterus (endometrium) from growing very thick.1 This makes the lining a poor place for a fertilized egg to implant and grow. The hormones in this IUD also reduce menstrual bleeding and cramping.
- Copper IUD. Copper is toxic to sperm. It makes the uterus and fallopian tubes produce fluid that kills sperm. This fluid containswhite blood cells, copper ions, enzymes, and prostaglandins.
- You can have an IUD inserted at any time, as long as you are not pregnant and you don't have a pelvic infection. An IUD is inserted into your uterus by your doctor. The insertion procedure takes only a few minutes and can be done in a doctor's office. Sometimes a local anesthetic is injected into the area around the cervix, but this is not always needed.
- Do not have sex, use tampons, or put anything in your vagina for the first 24 hours after you have an IUD inserted.
IUD use is safe in women with the following conditions:
- History of an ectopic pregnancy
- History of pelvic surgery
- Hypertension or other forms of heart disease
- History of deep venous thrombosis
- History of migraine headaches
- Diabetes
- Smoking
Absolute contraindications for IUD use include the following:
- Pregnancy
- Significantly distorted uterine anatomy
- Unexplained vaginal bleeding concerning for pregnancy or pelvic malignancy
- Gestational trophoblastic disease with persistently elevated beta-human chorionic gonadotropin levels
- Ongoing pelvic infection
Levonorgestrel-Releasing Intrauterine System (Mirena and Skyla) Insertion
The packaging is opened by an assistant, taking care to maintain the sterility of the package contents. Care is taken to ensure the arms of the IUD are in a horizontal position (see the image below).
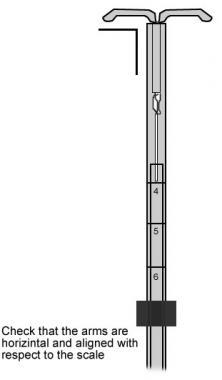 Ensuring horizontal positioning of IUD arms.
The threads on the handle of the IUD insertion device are then released from the groove in the handle of the insertion device. While pushing the slider toward the insertion tubing, the strings at the base of the IUD handle should be pulled, which will retract the IUD arms into the insertion tubing. See the image below.

Loading the levonorgestrel-releasing intrauterine system into insertion tubing with correct orientation of knobs at the end of the arms.
The threads are then secured in the thread cleft, as shown in the image below.

Securing threads on the handle of the insertion device.
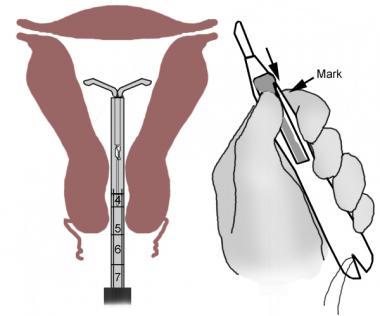
The flange on the insertion device is then set at the level to which the uterus sounds. This is accomplished by sliding the flange over the marked increments on the IUD insertion tube, as shown in the image below.
 Set the flange at the level to which the uterus sounds.
One hand is then used to provide gentle downward traction on the tenaculum. While continued upward pressure is applied to the green slider on the IUD handle, the insertion tubing is placed into the vagina at the level of the external cervical os. The insertion tubing is then gently advanced until the flange is approximately 1.5-2 cm from the external cervical os. See the image below.
 Advancing the insertion tubing to 1.5 cm from the external cervical os.
Next, the slider on the handle is pulled backward to the level of the raised mark on the insertion handle, expelling the IUD arms from the insertion tubing (see the image below), and wait 10 seconds to allow the arms to open completely.
 Retracting slider and expelling the IUD from insertion device.
The insertion tubing is then advanced until the flange is at the external cervical os, thereby advancing the IUD to the level of the uterine fundus (see the image below).
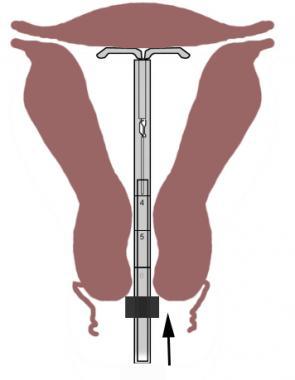 Advancing the insertion tubing until the flange is at the level of the external os.
While holding the insertion device steady, the slider is pulled all the way down to release the IUD. The IUD handle and insertion tubing are then gently retracted from the uterus and cervix. The strings will remain in place. See the image below.
 Pulling the slider down completely to release the IUD.
Following removal of the insertion device, the IUD strings will be readily visualized in vagina. Using long-handled scissor, the strings are then trimmed so that approximately 3 cm are visible, extending from the external cervical os.[52] See the image below.
 Trimming the IUD strings to 3-4 cm.
Copper T380A IUD (Paraguard) Insertion
The copper T380A packaging is opened by an assistant, taking care to maintain the sterility of the package contents.
Load the IUD into the insertion tubing. This is accomplished by slightly withdrawing the insertion tubing and folding the horizontal arms of the IUD down along the vertical arm using your thumb and index finger. The insertion tubing is then advanced so that the horizontal arms sit securely within the insertion tubing. See the images below.
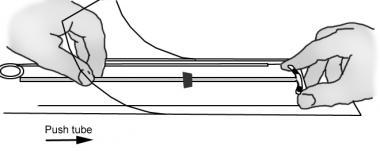 Loading the copper T380A IUD into the insertion tubing.
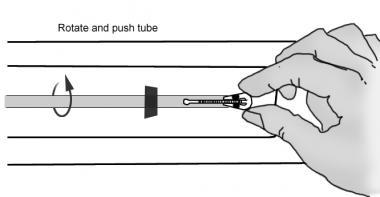 Loading the copper T380A IUD into the insertion tubing.
Next, the solid white rod is introduced into the bottom of the insertion tubing and advanced to the point that it touches the bottom of the IUD (see the image below).
 Placing the insertion tubing containing the copper T380A IUD.
The insertion tube is grasped at the open end and the blue flange is set to the level to which the uterus sounds. The insertion tubing is then rotated so that the horizontal arms of the IUD are parallel to the long axis of the blue flange. See the image below.
 Releasing the arms of the copper T380A IUD.
The loaded insertion tube is passed through the cervical canal until resistance is met at the uterine fundus and the blue flange should be at the external cervical os, as shown in the image below.
 Advancing the insertion tubing to the fundus, where slight resistance is felt.
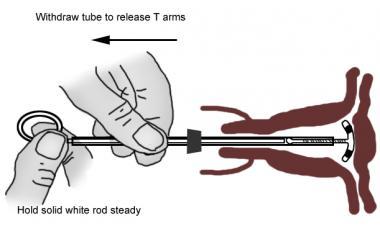
With the solid white rod steady, the insertion tubing is withdrawn approximately 1 cm, releasing the IUD.
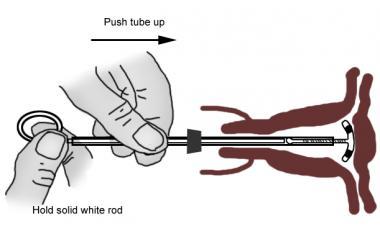
The insertion tube is then gently moved up to the fundus of the uterus, ensuring placement of the IUD at the level of the fundus. Holding the insertion tubing steady, withdraw the white rod. Then, gently withdraw the insertion tubing. See the image below.
 Holding the insertion tube steady and withdrawing the white rod.
Following removal of insertion device, the IUD strings will be readily visualized in vagina. Using long-handled scissors, the strings are then trimmed so that approximately 3 cm are visible extending, from the external cervical os.[53] See the image below.
 Trimming the IUD strings.
Referral http://emedicine.medscape.com/article/1998022-overview#a3